Einführung
Produktentwicklungsteams stehen vor einer ständigen Herausforderung: Wie können Teiledesigns ohne die enormen Kosten für Produktionswerkzeuge validiert werden? Die herkömmliche Spritzgussformherstellung erfordert Werkzeuge im Wert von $75.000 bis $200.000 - eine erhebliche Hürde für das Testen von Konzepten.
Spritzgießen von Prototypen ändert diese Gleichung völlig. Anstatt sich auf teure Werkzeugstahlformen festzulegen, können Konstrukteure funktionale Teile mit Aluminium-Prototypenwerkzeugen für $2.500 bis $12.000 herstellen. Diese kostengünstigeren Formen produzieren Kunststoffteile, die der Produktionsqualität entsprechen, und ermöglichen es den Teams, die Funktionalität der Teile und die Materialeigenschaften zu überprüfen, bevor die Serienproduktion beginnt.
Dieser Leitfaden erklärt, wann Prototyp Kunststoff-Spritzgießen für Ihr Projekt sinnvoll ist, was es kostet und wie Sie häufige Fehler vermeiden, die Zeit und Geld kosten.
Was den Prototyp-Spritzguss auszeichnet
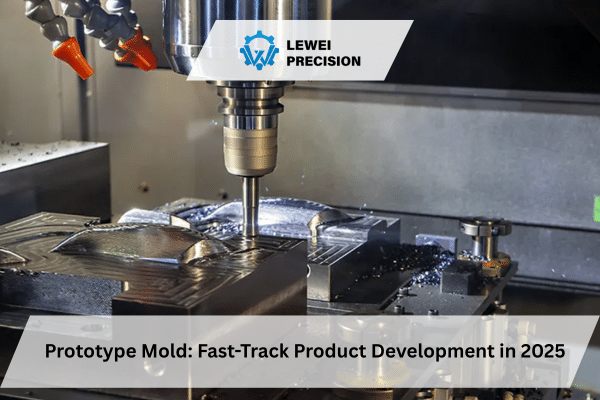
A Prototypenform dient einem bestimmten Zweck - der Validierung von Teiledesigns mit tatsächlichen Gussteilen, bevor in Produktionswerkzeuge investiert wird. Der Hauptunterschied? Diese Formen werden aus Aluminium statt aus gehärtetem Werkzeugstahl hergestellt, was sowohl die Bearbeitungszeit als auch die Kosten erheblich reduziert.
Der Formgebungsprozess selbst funktioniert genauso wie die Großserienfertigung. Der geschmolzene Kunststoff wird in die Kavität eingespritzt, kühlt ab und wird als fertiges Teil ausgestoßen. Der Unterschied liegt in der Werkzeugkonstruktion und der erwarteten Produktionskapazität.
Werkzeugstandzeit und Produktionskapazität
Prototypenwerkzeuge aus Aluminium produzieren in der Regel 500 bis 5.000 Teile, bevor sich der Verschleiß bemerkbar macht. Nicht-abrasive Materialien wie ABS oder Polypropylen maximieren die Lebensdauer der Werkzeuge. Glasgefüllte Harze und andere abrasive Materialien reduzieren sie um die Hälfte.
Diese Produktionskapazität eignet sich perfekt für die meisten Validierungsanforderungen. Designteams können Funktionstests durchführen, Feedback vom Markt einholen und sichere Änderungen vornehmen, bevor sie sich für Produktionsformen entscheiden.
Nach Angaben der Society of Plastics Engineers aus dem Jahr 2024 werden Unternehmen, die Prototyp-Spritzgießen verkürzten ihre Produktentwicklungszyklen um 37% im Vergleich zu denjenigen, die direkt zur Produktion übergehen.
Wenn Prototypenwerkzeuge andere Rapid-Prototyping-Verfahren schlagen
Produktionsäquivalente Materialien sind wichtig
Für 3D-gedruckte Teile werden spezielle Materialien verwendet, die nicht mit den Kunststoffen aus der Endproduktion übereinstimmen. Prototyp Kunststoff-Spritzguss ermöglicht es den Teams, mit denselben Materialien zu testen, die sie auch für die Serienproduktion verwenden werden - echtes ABS, Polycarbonat, Nylon oder was auch immer für das Endprodukt erforderlich ist.
Dies ist für die Validierung von enormer Bedeutung. Ein Schnappverschluss, der für ein Material entwickelt wurde, verhält sich in einem anderen völlig anders. Die Schrumpfungsraten schwanken je nach Harz zwischen 0,3% und 2,5%. Tests mit produktionsgleichen Materialien decken diese Probleme frühzeitig auf.
Kosteneffizienter als 100 Teile
Der 3D-Schnelldruck ist bei 10-20 Teilen sinnvoll. Aber bei höheren Stückzahlen verschiebt sich die Rechnung dramatisch. A Prototypenform wird um 75-100 Teile herum kosteneffizient und bleibt bis zu mehreren tausend Teilen wirtschaftlich.
Break-even-Vergleich für ein typisches Gehäuseteil:
- 50 Teile: 3D-Druck gewinnt mit $2.800 gegenüber dem Gießen mit $4.200
- 150 Teile: Das Spritzgießen übernimmt bei $5.400 gegenüber dem Drucken bei $8.400
- 400 Teile: Lücke vergrößert sich - Spritzguss $7.200 vs. Druck $22.400
Mechanische Eigenschaften entsprechen der Produktion
Bei der additiven Fertigung entstehen Teile mit gerichteter Festigkeit - sie sind in einigen Richtungen stärker als in anderen. Spritzgegossene Teile haben durchgehend gleichbleibende mechanische Eigenschaften.
Diese Konsistenz ist wichtig für Strukturteile, lebende Scharniere und alle Teile, die wiederholten Belastungen ausgesetzt sind. Durch die Prüfung im Spritzgussverfahren wird die Funktionalität der Teile unter realen Bedingungen validiert.
Verfügbare Materialien für das Prototypenspritzgießen
Standard-Spritzgussmaterialien eignen sich hervorragend für Prototypenwerkzeuge aus Aluminium. Die Auswahl der Kunststoffe entspricht dem, was für die Produktion zur Verfügung steht, und liefert genaue Validierungsergebnisse.
Gängige technische Kunststoffe
ABS bleibt das Arbeitspferd für Prototypen. Gute Schlagzähigkeit, einfache Bearbeitung, gute Akzeptanz von Texturen. In der Unterhaltungselektronik und der Kfz-Innenausstattung wird es häufig verwendet. Die Materialkosten liegen zwischen $2,80 und $4,20 pro Pfund.
Polypropylen ist chemikalienbeständig und biegt sich, ohne zu brechen. Lebende Scharniere hängen von der Ermüdungsbeständigkeit von PP ab. Häufig in Behältern, Automobilteilen und Gussanwendungen, die chemische Beständigkeit erfordern. Die Kosten liegen bei $1,90-$2,60 pro Pfund.
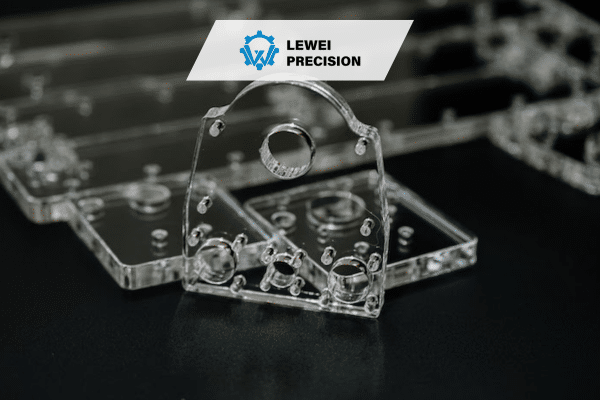
Polycarbonat verbindet optische Klarheit mit außergewöhnlicher Schlagzähigkeit. Sicherheitsausrüstung, transparente Gehäuse und Beleuchtungskomponenten benötigen die Eigenschaften von PC. Die Hitzebeständigkeit erreicht 135°C. Erwarten Sie $3,80-$5,20 pro Pfund.
Spezialisierte Harze
Nylon (PA6/PA66) bietet eine hervorragende Verschleißfestigkeit für Zahnräder, Lager und Strukturteile. Glasgefüllte Sorten erhöhen die Steifigkeit 250%, verschleißen aber die Formen schneller. Die Materialkosten liegen zwischen $3,20 und $6,40 pro Pfund.
TPE-Werkstoffe bieten gummiartige Flexibilität bei gleichzeitiger Formbarkeit. Eine Shore-Härte von 35A bis 85A deckt die meisten Soft-Touch-Anwendungen ab. TPE wird häufig für Griffe, Dichtungen und Dichtungsringe verwendet. Die Kosten liegen zwischen $4,40 und $8,60 pro Pfund.
Glasgefüllte Harze erhöhen die Festigkeit und Dimensionsstabilität für strukturelle Formgebungsanwendungen. Luft- und Raumfahrt- sowie Industrieteile profitieren von geringerem Verzug. Beachten Sie, dass sich die Lebensdauer von Prototypenwerkzeugen durch abrasive Materialien wie diese um 50-60% verringert. Die Preise liegen zwischen $3,80-$7,40 pro Pfund.
Untersuchungen des Branchenberichts 2024 des Plastics Technology Magazine zeigen, dass die Materialauswahl rund 40% der Teilekosten bestimmt und sich direkt auf die Langlebigkeit der Werkzeuge auswirkt.
Konstruktionsrichtlinien zur Vermeidung von Gussfehlern
Ein von Anfang an richtiges Kern- und Kavitätendesign erspart später viel Kopfzerbrechen. Die meisten Gussfehler gehen auf grundlegende Designprobleme zurück, die in der CAD-Phase hätten erkannt werden können.
Die Wanddicke steuert alles
Bei den meisten Kunststoffen sollte die Wandstärke zwischen 1,8 mm und 3,5 mm liegen. Dicker bedeutet nicht stärker - es bedeutet Verzug, Einfallstellen und längere Zykluszeiten. Abweichungen von mehr als 30% zwischen den Abschnitten verursachen Probleme.
Schnellreferenz:
- ABS, PP, PS: 1,8-3,0 mm optimal
- PC, Nylon: 2,2-3,5 mm funktionieren besser
- Glasgefüllt: 2,8-4,0 mm Griffe Steifigkeit
Sie benötigen eine Verstärkung? Fügen Sie Rippen mit 50-60% der nominalen Wandstärke hinzu, anstatt das gesamte Teil dicker zu machen.
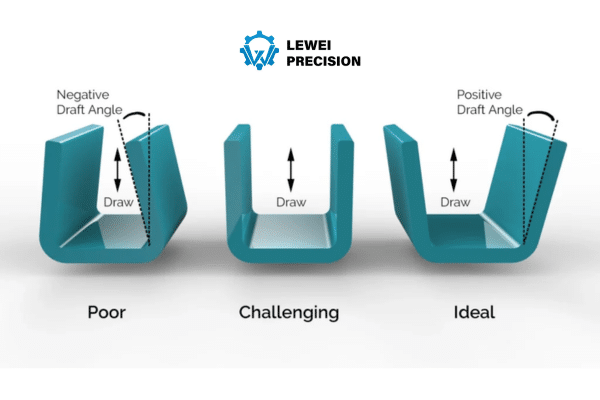
Entnahmewinkel ermöglichen sauberen Auswurf
Die Teile müssen sich aus der Kavität lösen, ohne zu kleben oder zu schleifen. Mindestens 1,5° pro Seite reichen für glatte Oberflächen aus. Bei strukturierten Oberflächen sind wegen der Reibung 3-5° erforderlich.
Tiefe Rippen, hohe Vorsprünge oder komplexe Geometrie? Erhöhen Sie den Verzug auf mindestens 3°. Ein unzureichender Verzug beschädigt die Oberfläche des Teils beim Auswerfen und verschleißt das Werkzeug schneller.
Eine Fertigungsstudie aus dem Jahr 2024 ergab, dass unzureichende Entformungswinkel 31% der Prototypenwerkzeugausfälle und Verzögerungen verursachten.
Merkmale, die Produktionsformen erfordern
Behalten Sie Prototypenwerkzeuge einfach. Merkmale, die die Kosten 200-400% erhöhen:
- Seitliche Aktionen, die Schlitten oder Heber benötigen
- Innengewinde (handgespannte Einsätze funktionieren gut)
- Mehrere Trennlinien
- Komplexe Hinterschneidungen, die zusammenbrechende Kerne erfordern
Wenn diese Merkmale ein Muss sind, sollten Sie in Erwägung ziehen, direkt mit der Herstellung von Werkzeugen zu beginnen oder das Design für die Fertigung umzugestalten.
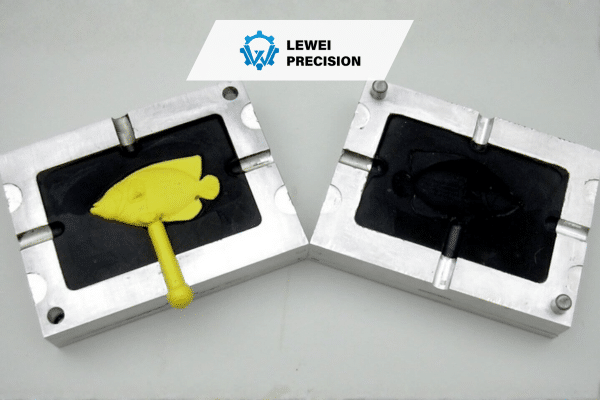
Gate-Auswahl für Prototyp-Anwendungen
Anschnitte steuern, wie der Kunststoff in die Kavität fließt. Für schnelle Prototyp-Formen:
Randtore 80% von Situationen sauber zu handhaben. Material tritt von der Seite ein, leicht zu trimmen.
Direkte Angussanschnitte sind am einfachsten zu bearbeiten, hinterlassen aber eine sichtbare Markierung an der Stelle, an der der Läufer befestigt ist.
Lüftertore verteilen das Material über weite, dünne Abschnitte, verhindern Fließlinien und reduzieren den Verzug.
Heißkanalsysteme machen Angüsse überflüssig, erhöhen aber die Werkzeugkosten um $3.500-$9.000. Für Prototyp-Gussanwendungen nur selten gerechtfertigt.
Kostenaufschlüsselung für Prototyp-Spritzgießen
Das Verständnis der Kostenfaktoren hilft den Teams, ihre Budgets genau zu planen und intelligente Entscheidungen über die Konstruktion von Werkzeugen und Produktionsmengen zu treffen.
Investitionsfaktoren für Werkzeuge
Prototyp-Form Die Kosten hängen von mehreren Faktoren ab:
Die Größe der Teile spielt eine Rolle - kleine Komponenten unter 75 mm beginnen bei etwa $2.500. Mittlere Teile kosten $4.000-$7.000. Große Teile über 200 mm kosten zwischen $8.000 und $13.000.
Die Komplexität bestimmt die Bearbeitungszeit. Einfache Geometrien mit grundlegenden Merkmalen kosten 40-55% weniger als Teile mit engen Toleranzen, mehreren Hohlräumen oder komplizierten Details.
Toleranzen beeinflussen den Preis. Standard-Bearbeitungstoleranzen (±0,005″) sind im Preis enthalten. Engere Spezifikationen (±0,002″) erfordern Präzision CNC-Bearbeitungunter Hinzufügung von 35-50% zu den Kosten.
Auch die Oberflächenanforderungen sind wichtig. Eine einfache maschinelle Bearbeitung ist Standard. Das Hinzufügen von Texturen oder Polieren kostet $450-$1.400 extra.
Produktionskosten pro Teil
Ist das Werkzeug erst einmal vorhanden, werden die Teile erstaunlich erschwinglich:
| Teil Gewicht | Kosten pro Teil |
| 15-40g | $0.90-$2.80 |
| 40-120g | $2.80-$6.50 |
| 120-300g | $6.50-$17.00 |
| Über 300g | $17.00-$35.00 |
Mengenrabatte wirken sich schnell aus. Die Bestellung von 500 Teilen kostet 35-45% weniger pro Stück als die Bestellung von 100.
Zu beachtende versteckte Kosten
Konstruktionsänderungen nach dem Bau des Werkzeugs kosten je nach Komplexität $700-$2.800. Die Änderung des Kerns und der Kavität erfordert zusätzliche CNC-Bearbeitungszeit.
Bei einem Material- oder Farbwechsel fallen zusätzlich $175-$450 für Spülung und Einrichtung an. Bei jedem Harzwechsel muss die Maschine gründlich gereinigt werden.
Für Eilaufträge unter 10 Tagen fallen 30-50%-Aufschläge an. Eilige Bearbeitung und vorrangige Terminierung kosten extra.
Laut einer Kostenanalyse des Manufacturing Engineering Journal aus dem Jahr 2025 lassen sich durch eine ordnungsgemäße Budgetierung und realistische Zeitpläne 76% Projektverzögerungen vermeiden.
Der Prozess des Prototypengusses erklärt
Die Kenntnis der einzelnen Phasen hilft den Teams bei der Planung des Zeitplans und der Vorbereitung der für eine reibungslose Projektdurchführung erforderlichen Unterlagen.
Design-Upload und erste Überprüfung
Laden Sie CAD-Dateien im STEP-, IGES- oder Parasolid-Format hoch. Für einfache Teile mit überschaubarer Geometrie erhalten Sie sofort ein automatisches Angebot. Komplexe Konstruktionen benötigen 24-36 Stunden für eine manuelle technische Prüfung.
Analyse des Designs für die Herstellbarkeit
Die Ingenieure untersuchen Ihren Entwurf auf mögliche Formfehler:
- Wanddickenkonsistenz und Übergänge
- Angemessener Entlastungswinkel für sauberen Auswurf
- Lage des Anschnitts und plastische Fließmuster
- Ob die Features richtig ausgeworfen werden
- Erreichbarkeit von Toleranzen mit Aluminiumwerkzeugen
DFM-Berichte identifizieren Probleme, bevor die Bearbeitung beginnt. Änderungen an der Konstruktion kosten jetzt nichts mehr. Probleme zu beheben, nachdem das Werkzeug gebaut wurde, kostet Tausende.
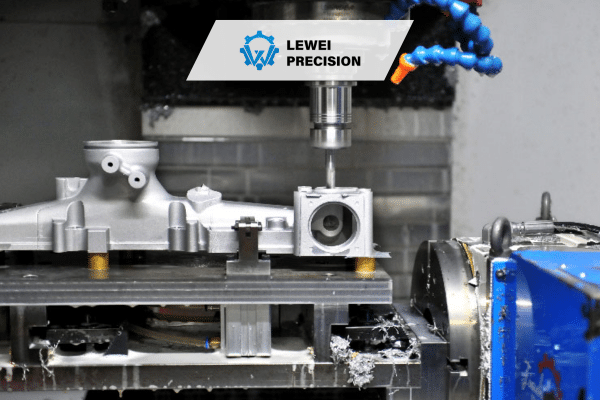
CNC-Bearbeitung und Werkzeugbau
Moderne CNC-Maschinen schneiden die Prototypenform aus Aluminiummaterial:
- Basis- und Einsatzbearbeitung
- Kern- und Hohlraumerstellung mit präziser Geometrie
- Kühlkanalbohren zur Optimierung der Zykluszeit
- Einbau und Ausrichtung des Auswerferstifts
- Oberflächenbearbeitung nach vorgegebener Textur
Die Vorlaufzeit für typische Teile beträgt 8-14 Arbeitstage. Bei komplexer Geometrie oder engen Toleranzen verlängert sich diese Zeit auf 16-20 Tage.
Erster Artikel und Validierung
Die ersten Teile (T1-Muster) werden mit Hilfe von Koordinatenmessmaschinen auf ihre Abmessungen geprüft. Kritische Abmessungen werden anhand der CAD-Spezifikationen überprüft.
T1-Muster werden zur Genehmigung durch den Kunden versandt. Geringfügige Anpassungen der Verarbeitungsparameter oder der Kühlung optimieren die Qualität der Teile vor der vollständigen Produktion.
Produktionslauf und Qualitätskontrolle
Nach der Freigabe werden die vollen Stückzahlen mit prozessbegleitenden Qualitätskontrollen geformt. Die Maßkontrolle erfolgt in regelmäßigen Abständen während des gesamten Produktionsprozesses.
Die Endkontrolle bestätigt, dass alle Teile den Spezifikationen entsprechen, bevor sie verpackt und versandt werden.
Werkzeuglagerung und zukünftige Bestellungen
Die Formen bleiben in der Regel 12-24 Monate lang kostenlos gelagert. Sie sind Eigentümer des Werkzeugs, können also jederzeit eine Lieferung anfordern oder zusätzliche Aufträge zu Material- und Arbeitskosten erteilen.
Auswahl des richtigen Produktionspartners
Die Suche nach einem Hersteller mit den richtigen Fähigkeiten und Qualitätssystemen sichert den Projekterfolg und verhindert kostspielige Fehler.
Technische Fähigkeiten, auf die es ankommt
Suchen Sie nach Einrichtungen mit moderner Ausstattung und eigenen Kapazitäten:
- 5-Achsen-CNC-Bearbeitung Zentren für komplexe Kern- und Hohlraumarbeiten
- Konstruktion von Formen (nicht nur Bearbeitung)
- Spritzgusspressen von 50 bis 500 Tonnen
- Materialbestand von mindestens 60+ Harzen
- CMM und optische Prüfgeräte
Hersteller, die Formen bauen und Teile unter einem Dach produzieren, optimieren die Kommunikation und die Verantwortlichkeit. Es gibt keine Schuldzuweisungen zwischen Werkzeugmacher und Gießer.
Zu überprüfende Qualitätszertifikate
Die ISO 9001:2015 umfasst ein grundlegendes Qualitätsmanagement, das für alle Branchen gilt.
ISO 13485 ist für die Herstellung von medizinischen Geräten erforderlich.
Die IATF 16949 gewährleistet die Einhaltung der Qualitätsstandards in der Automobilindustrie.
AS9100D demonstriert die Fähigkeit zur Fertigung in der Luft- und Raumfahrt.
Ein Branchenbericht der American Society of Manufacturing Engineers aus dem Jahr 2024 zeigt, dass zertifizierte Hersteller 71% weniger Qualitätsprobleme haben als nicht zertifizierte Betriebe.
Realistische Erwartungen an die Vorlaufzeit
Standard Prototyp-Spritzgießen Zeitpläne:
- Einfache Teile, grundlegende Funktionen: 11-15 Tage
- Mittlere Komplexität: 15-19 Tage
- Komplexe Geometrie, enge Toleranzen: 19-26 Tage
Jeder, der eine Lieferzeit von 5 Tagen verspricht, spricht entweder von den einfachsten Teilen, die man sich vorstellen kann, oder verlangt erhebliche Eilgebühren.
Kommunikation und Projektleitung
Effektive Partner bieten engagierte Projektmanager, regelmäßige Statusaktualisierungen, reaktionsschnellen technischen Support und eine transparente Preisgestaltung ohne überraschende Gebühren.
Holen Sie detaillierte Angebote von 3-4 Herstellern ein. Vergleichen Sie die aufgeschlüsselten Werkzeugkosten, die Preise pro Teil bei Ihrer Zielmenge, die tatsächlichen Lieferzeiten und die Zahlungsbedingungen.
Sehr niedrige Kostenvoranschläge deuten in der Regel auf Unerfahrenheit, eine Offshore-Produktion mit Qualitätsproblemen oder versteckte Kosten hin, die erst später auftauchen.
Häufige Fehler, die Geld verschwenden
Das Lernen aus den Fehlern anderer spart bei Prototyp-Projekten viel Zeit und Geld.
Ignorieren technischer Empfehlungen
DFM-Feedback gibt es aus guten Gründen. Das Ablehnen von Änderungsvorschlägen führt zu:
- Im Werkzeug festsitzende Teile, die von Hand entfernt werden müssen
- Sichtbare Einfallstellen auf kosmetischen Oberflächen
- Auswurfschäden an Ecken und dünnen Merkmalen
- Probleme mit der Maßgenauigkeit durch Verformung
Die Durchführung von Konstruktionsänderungen vor der Bearbeitung kostet nichts. Änderungen nach Fertigstellung des Werkzeugs kosten $700-$2.800.
Materialabweichungen zwischen Prototyp und Produktion
Die Erprobung eines Kunststoffs und die anschließende Umstellung auf eine Serienproduktion führt zu Problemen. Verschiedene Harze haben unterschiedliche:
- Schrumpfungsraten (0,4% bis 2,3% Variation)
- Fließeigenschaften, die sich auf Füllmuster auswirken
- Verarbeitungstemperaturen und Zykluszeit
- Mechanische Eigenschaften und Flexibilität
Verwenden Sie das vorgesehene Produktionsmaterial für Prototyp Kunststoff-Spritzgießen wann immer möglich. Genaue Validierung erfordert genaue Materialien.
Unterschätzung von Teilmengen
Bei kleinen Erstbestellungen gibt es keine Mengenrabatte, und die Form muss möglicherweise mehrmals hergestellt werden. Berechnen Sie einen realistischen Bedarf:
- Proben für Funktionstests: 25-35% von insgesamt
- Zerstörende Prüfung: 12-18%
- Validierung der Montage: 25-35%
- Markttest- oder Beta-Einheiten: Restmenge
Die Bestellung einer angemessenen Menge im Voraus reduziert die Kosten pro Teil um 35-45%.
Die Zeitachse im Eiltempo
Der Druck, die Vorlaufzeit zu verkürzen, führt zu einer unzureichenden Entwurfsprüfung, zu Bearbeitungsfehlern aufgrund von Eile, zu höheren Eilgebühren und zu Werkzeugausfällen, die Reparaturen erfordern.
Nehmen Sie sich ausreichend Zeit für eine gründliche technische Analyse und eine hochwertige Bearbeitung. Wer sich beeilt, spart selten Zeit - er verlagert nur die Probleme nach unten.
Überspringen der Baugruppenvalidierung
Einzelne Teile können perfekt aussehen, aber beim Zusammenbau mit anderen Komponenten versagen. Testen Sie den tatsächlichen Zusammenbau:
- Übereinstimmung mit anderen Teilen des Produkts
- Einrastkraft und Rückhaltung
- Ausrichten von Aufsatz und Bohrung bei Toleranzschwankungen
- Freiräume, wenn alle Teile aufeinander gestapelt sind
Durch frühzeitige Montagetests werden Probleme erkannt, und Korrekturen bleiben kostengünstig.
Vergleich von Fertigungsmethoden
Verschiedene Rapid-Prototyping-Verfahren eignen sich für unterschiedliche Projektanforderungen. Ein Verständnis der Stärken und Grenzen führt zu intelligenten Entscheidungen.
3D-Druckverfahren
Die additive Fertigung eignet sich hervorragend für sehr geringe Stückzahlen (5-30 Teile), komplexe interne Merkmale, die sich nicht abformen lassen, und eine extrem schnelle Durchlaufzeit (2-4 Tage).
Zu den Einschränkungen gehören eingeschränkte Materialoptionen, die nicht mit den Produktionskunststoffen übereinstimmen, anisotrope mechanische Eigenschaften, die je nach Druckrichtung variieren, und Kosten pro Teil, die linear mit der Stückzahl steigen.
CNC-Bearbeitung
Die subtraktive Fertigung bietet eine hervorragende Maßgenauigkeit, ist für Metalle und Kunststoffe geeignet, erfordert keine Entformungsschrägen und ermöglicht eine hohe Oberflächengüte.
Die Bearbeitung von Kunststoffteilen wird jedoch schnell teuer, die Vorlaufzeiten für mehrere Teile verlängern sich, der Materialabfall ist hoch und die Kosten werden ab 60 Stück untragbar.
Urethan-Guss
Gussverfahren eignen sich gut für weiche Materialien, erfassen feine Oberflächendetails, eignen sich für moderate Stückzahlen (30-250 Teile) und bieten angemessene Kosten pro Teil.
Allerdings entsprechen die Gussmaterialien nicht genau den Spritzguss-Kunststoffen, es sind zunächst Urmodelle erforderlich, die Formen nutzen sich nach 20-30 Schüssen ab, und die Hochtemperaturmaterialien funktionieren nicht.
Entscheidungsrahmen
Wählen Sie Prototyp-Spritzgießen wenn:
- Mengen von mehr als 80-120 Teilen
- Produktionsäquivalente Materialien sind unerlässlich
- Mechanische Eigenschaften müssen der Serienproduktion entsprechen
- Geplant ist die Herstellung von Großserien
- Funktionstests erfordern Haltbarkeit
Industrieanwendungen
Verschiedene Sektoren verwenden Prototyp-Formen für spezifische Validierungserfordernisse, bevor Sie sich für Produktionswerkzeuge entscheiden.
Entwicklung medizinischer Geräte
Die FDA und die Aufsichtsbehörden verlangen Tests mit tatsächlichen Produktionsmaterialien. Prototyp Kunststoff-Spritzguss stellt biokompatible Teile für chirurgische Instrumente, Gehäuse für Diagnosegeräte, Komponenten für die Verabreichung von Medikamenten und sterile Verpackungen her.
Die Zertifizierung nach ISO 13485 gewährleistet eine ordnungsgemäße Dokumentation und Rückverfolgbarkeit für die Einreichung von Zulassungsanträgen.
Automobilkomponenten
Im Innenraum sind Kunststoffe gefragt, die Hitze, Chemikalien und Vibrationen standhalten. Die Validierungstests umfassen Sensorgehäuse, Innenverkleidungsteile, Fluidsystemkomponenten und elektrische Anschlüsse.
Die Teile werden vor der Produktionsfreigabe thermischen Zyklen, chemischen Belastungen und mechanischen Belastungstests unterzogen.
Unterhaltungselektronik
Enge Toleranzen und kosmetisches Aussehen bestimmen diesen Sektor. Gerätegehäuse, Batteriefächer, Ladeschnittstellen und interne Halterungen müssen mit produktionsähnlichen Teilen validiert werden.
Markttests mit tatsächlich geformten Teilen liefern genaues Verbraucherfeedback zu Passform, Verarbeitung und Funktionalität.
Luft- und Raumfahrtanwendungen
Für gewichtskritische Komponenten werden glasgefüllte Harze verwendet, um das Verhältnis von Festigkeit zu Gewicht zu verbessern. Innenverkleidungen, Gerätegehäuse, Flüssigkeitsanschlüsse und Montageteile müssen unter Flugbedingungen validiert werden.
Die AS9100D-Zertifizierung gewährleistet Rückverfolgbarkeit und Qualität für flugkritische Teile.
Industrielle Ausrüstung
Raue Betriebsumgebungen erfordern haltbare Kunststoffe. Schalttafelgehäuse, Schutzvorrichtungen, Komponenten für die Handhabung von Flüssigkeiten und Befestigungselemente werden in Tests unter realen Bedingungen validiert.
Chemische Beständigkeit und Schlagzähigkeit werden geprüft, bevor die Produktion beginnt.
Schlussfolgerung
Spritzgießen von Prototypen füllt die kritische Lücke zwischen Konzept und Serienproduktion. Echte Spritzgussteile aus produktionsäquivalenten Materialien validieren Entwürfe ohne die massiven Investitionen in Produktionswerkzeuge.
Eine kluge Materialauswahl, die Beachtung der Herstellbarkeit des Designs und eine gründliche technische Überprüfung maximieren die Erfolgsquote. Planen Sie eine realistische Vorlaufzeit für Qualitätsarbeit ein. Arbeiten Sie mit zertifizierten Herstellern zusammen, die ihre Fähigkeiten unter Beweis gestellt haben.
Die Investition in Prototyp-Formen verhindert teure Fehler bei der Serienproduktion. Tests mit echten Materialien unter realen Bedingungen schaffen Vertrauen, bevor die Produktion beginnt.
Häufig gestellte Fragen
Wie lange hält ein Prototypenwerkzeug normalerweise?
Mit Aluminiumformen können 500 bis 5.000 Teile hergestellt werden, je nach Abriebfestigkeit des Materials und Komplexität der Geometrie. Ungefüllte Kunststoffe maximieren die Werkzeugstandzeit, während glasgefüllte Harze sie um die Hälfte reduzieren.
Wie hoch ist die Mindestbestellmenge?
Die meisten Hersteller verlangen mindestens 60-100 Teile, um die Einrichtungskosten zu rechtfertigen. Einige akzeptieren 30 Teile mit höheren Stückpreisen. Unter 60 Teilen macht der 3D-Druck in der Regel wirtschaftlich mehr Sinn.
Können Aluminiumwerkzeuge zu Produktionswerkzeugen aufgerüstet werden?
Nein, Prototypenwerkzeuge aus Aluminium können nicht zu Produktionswerkzeugen aus gehärtetem Stahl aufgerüstet werden. Sie dienen als Grundlage für die Entwicklung von Produktionswerkzeugen bis hin zur Validierung, erfordern aber für die Produktion von Großserien eine separate Werkzeugausstattung.
Wie viel kosten zusätzliche Teile von vorhandenen Werkzeugen?
Bei Nachbestellungen fallen nur die Kosten für Material, Arbeit und Einrichtung an - in der Regel $125-$350 für die Einrichtung plus Kosten pro Teil. Zusätzliche Mengen kosten 65-75% weniger als Erstbestellungen, da die Werkzeuge bereits bezahlt sind.
Wann sollte ich stattdessen Produktionswerkzeuge verwenden?
Ziehen Sie Produktionsformen in Betracht, wenn das Lebenszeitvolumen 12.000 Teile übersteigt, komplexe Merkmale seitliche Eingriffe erfordern, erstklassige Oberflächengüten unerlässlich sind oder das Design vollständig fertiggestellt ist und keine Änderungen zu erwarten sind.
Referenzen
- Gesellschaft der Kunststoffingenieure. (2024). "Jährlicher Bericht über Fertigungstrends: Injection Molding Sector Analysis". SPE Technical Publications, S. 127-145.
- Zeitschrift Plastics Technology. (2024). "Cost-Benefit Analysis of Rapid Tooling vs. Production Tooling in Product Development". Industry Research Division, Vol. 70, Ausgabe 8.
- Moderne Kunststoffe weltweit. (2025). "Leitfaden zur Materialauswahl für das Spritzgießen: Properties, Costs, and Applications". Technical Resource Center, Ausgabe Januar.
- Zeitschrift für Fertigungstechnik. (2024). "Qualitätsmetriken in der Prototypenfertigung: A Comprehensive Industry Study." American Society of Manufacturing Engineers, Vol. 152, No. 4, pp. 78-92.
- Internationale Zeitschrift für fortgeschrittene Fertigungstechnik. (2024). "Vergleichende Analyse von Rapid-Prototyping-Verfahren: Economic and Technical Considerations." Springer Publishing, Vol. 131, pp. 2847-2863.